Friday, December 15, 2017
Eportfolio week 13
During the lectures, we have a quiz section where each groups prepared some questions. There are some questions asked such as what will happen if during the smear preparation if the specimen is overheated during heat fixation, the definition of heat fixation, what are different types of hemolysis and the reagents used for gram-staining. There are questions asked on what is acid-fast staining and which types of organisms suitable to grow in 7.5 % NaCl nutrient agar plates. Group 7 answered the most questions and was the winner of the quiz .
Eportfolio week 12
Experiment 18: Serial Dilution-Agar Plate Procedure to Quantitate Viable Cells
From this experiment, I learnt how to enumerate the microorganisms in a given sample. There are many ways to determine the microbial growth. There are direct counting methods, chemical methods, measure the tubidity and the serial-dilution plate method. In this experiment, we do the serial-dilution plate method. From the given sample of E. coli, we carrries out a series of dilution. Then, we dilute the sample further by using pour plate and spread plate to get single colonies. After incubation, we count the single colonies present by using the Quebec colony counter. The number of colonies counted are taken for a range between 30 too 300. The number of colonies which is over 300 are labelled as TNTC while TFTC is labelled for plate which has colonies of less that 30.The procedures of the experiment are as followed. The procedures of the experiment are as followed. Six agar deep tubes are liquefied in an autoclave or by boiling. The molten agar tubes was cooled and maintained in a water bath at 45 °C . The E. coli culture tube are labelled with the number 1 and the seven 9-ml water blanks as numbers 2 through 8. The labelled tubes were placed in a test tube rack. The Petri dishes are labelled as 1A, 1B, 2A, 2B, 3A, and 3B. The E. coli culture was mixed by rolling the tube between the palms of the hands to ensure even dispersal of cells in the culture. Then, 1 ml from the bacterial suspension, Tube 1, was aseptically transferred to water blank Tube 2 with a sterile pipette. The pipette was discarded in the beaker of disinfectant. The culture has been diluted 10 times to 10-1. Tube 2 was mixed. With a fresh pipette, 1 ml from Tube 2 was transferred to Tube 3. The pipette was discarded. The culture has been diluted 100 times to 10-2. Tube 3 was mixed. With a fresh pipette, 1 ml from Tube 3 was transferred to Tube 4. The pipette was discarded. The culture has been diluted 1000 times to 10-3. Tube 4 was mixed. With a fresh pipette, 1 ml from Tube 4 was transferred to Tube 5. The pipette was discarded. The culture has been diluted 10000 times to 10-4. Tube 5 was mixed. With a fresh pipette, 0.1 ml from Tube 5 was transferred to Plate 1A. The pipette was returned to Tube 5 and 1 ml from Tube 5 is transferred to Tube 6. The pipette was discarded. The culture has been diluted 100000 times to 10-5. Tube 6 was mixed. With a fresh pipette, 1 ml of this suspension from Tube 6 was transferred to Plate 1B. The pipette was returned to Tube 6 and 0.1 ml was transferred from Tube 6 to Plate 2A. The pipette is returned to Tube 6 and1 ml from Tube 6 is transferred to Tube 7. The pipette was discarded. The culture has been diluted 1000000 times to 10-6. Tube 7 was mixed. With a fresh pipette, 1 ml of this suspension from Tube 7 was transferred to Plate 2B. The pipette was returned to Tube 7 and 0.1 ml was transferred from Tube 7 to Plate 3A. The pipette is returned to Tube 7 and1 ml from Tube 7 is transferred to Tube 8. The pipette was discarded. The culture has been diluted 10000000 times to 10-7. Tube 8 was mixed. 1 ml of this suspension was transferred from Tube 8 to Plate 3B with a fresh pipette. The pipette was discarded. The dilute procedure is now complete.

From this experiment, I learnt how to enumerate the microorganisms in a given sample. There are many ways to determine the microbial growth. There are direct counting methods, chemical methods, measure the tubidity and the serial-dilution plate method. In this experiment, we do the serial-dilution plate method. From the given sample of E. coli, we carrries out a series of dilution. Then, we dilute the sample further by using pour plate and spread plate to get single colonies. After incubation, we count the single colonies present by using the Quebec colony counter. The number of colonies counted are taken for a range between 30 too 300. The number of colonies which is over 300 are labelled as TNTC while TFTC is labelled for plate which has colonies of less that 30.The procedures of the experiment are as followed. The procedures of the experiment are as followed. Six agar deep tubes are liquefied in an autoclave or by boiling. The molten agar tubes was cooled and maintained in a water bath at 45 °C . The E. coli culture tube are labelled with the number 1 and the seven 9-ml water blanks as numbers 2 through 8. The labelled tubes were placed in a test tube rack. The Petri dishes are labelled as 1A, 1B, 2A, 2B, 3A, and 3B. The E. coli culture was mixed by rolling the tube between the palms of the hands to ensure even dispersal of cells in the culture. Then, 1 ml from the bacterial suspension, Tube 1, was aseptically transferred to water blank Tube 2 with a sterile pipette. The pipette was discarded in the beaker of disinfectant. The culture has been diluted 10 times to 10-1. Tube 2 was mixed. With a fresh pipette, 1 ml from Tube 2 was transferred to Tube 3. The pipette was discarded. The culture has been diluted 100 times to 10-2. Tube 3 was mixed. With a fresh pipette, 1 ml from Tube 3 was transferred to Tube 4. The pipette was discarded. The culture has been diluted 1000 times to 10-3. Tube 4 was mixed. With a fresh pipette, 1 ml from Tube 4 was transferred to Tube 5. The pipette was discarded. The culture has been diluted 10000 times to 10-4. Tube 5 was mixed. With a fresh pipette, 0.1 ml from Tube 5 was transferred to Plate 1A. The pipette was returned to Tube 5 and 1 ml from Tube 5 is transferred to Tube 6. The pipette was discarded. The culture has been diluted 100000 times to 10-5. Tube 6 was mixed. With a fresh pipette, 1 ml of this suspension from Tube 6 was transferred to Plate 1B. The pipette was returned to Tube 6 and 0.1 ml was transferred from Tube 6 to Plate 2A. The pipette is returned to Tube 6 and1 ml from Tube 6 is transferred to Tube 7. The pipette was discarded. The culture has been diluted 1000000 times to 10-6. Tube 7 was mixed. With a fresh pipette, 1 ml of this suspension from Tube 7 was transferred to Plate 2B. The pipette was returned to Tube 7 and 0.1 ml was transferred from Tube 7 to Plate 3A. The pipette is returned to Tube 7 and1 ml from Tube 7 is transferred to Tube 8. The pipette was discarded. The culture has been diluted 10000000 times to 10-7. Tube 8 was mixed. 1 ml of this suspension was transferred from Tube 8 to Plate 3B with a fresh pipette. The pipette was discarded. The dilute procedure is now complete.
The temperature of the molten agar
medium was checked to be sure the temperature is 45 °C. A tube was removed from the water bath and the
outside surface was dried with a paper towel. The agar is pour into Plate 1A by
using the pour-plate technique. The plate was rotated gently to ensure uniform
distribution of the cells in the medium. This step is repeated for the addition
of molten nutrient agar to Plates 1B, 2A, 2B, 3A, and 3B. Once the agar
solidified, the plates is incubated in an inverted position for 24 hours at 37 °C.
The
spread plate was also carried out to get single colony. Bacterial suspensions
are prepared as described above and agar plates were labelled accordingly. The
bent glass rod was placed into a beaker and a sufficient amount of 95% ethyl
alcohol to cover the lower, bent portion. An appropriately labelled nutrient
agar was placed on the turntable. 0.1 ml of bacterial suspension was placed on
the center of the plate with a sterile pipette. The glass rod was removed from
the beaker and it was passed through the Bunsen burner flame with the bent
portion of the rod pointing downward to prevent the burning alcohol from
running down the arm. The alcohol was allowed to burn off the rod completely.
The rod was cooled for 10 to 15 seconds. The Petri dish cover was removed. In
the absence of a turntable, the Petri dish was turned manually and the culture
was spreaded with the sterile bent glass rod.
Using
a Quabec colony counter and a mechanical hand counter, all colonies were
observed on plates. Statistically valid plate counts are only obtained from
bacterial dilutions that yield between 30 and 300 colonies.
Picture of Quebec Colony Counter
E-portfolio week 11
Experiment 16 and 17
Experiment 16: Physical Factores: Atmospheric Oxygen Requirements
In this experiment, I have learnt different oxygen requirements of different microorganisms. Basically, microorganisms are divided into five groups based on their oxygen requirements. There are aerobes which require oxygen, microaerophiles which require limites amounts of atmospheric oxygen for growth, obligate anaerobes which requires absent of oxygen, aerotolerant anaerobes whivh are fermentative organisms and facultative anaerobes which can grow in the presence or absence of oxygen. To carry out this experiment, the procedures are as followed.The procedures of the experiment are as followed. The sterile brain heart infusion agar is first liquefied by boiling in a waterbath at 100°C. Molten agar is cooled to 45°C. The temperature is checked with a thermometer inserted into the waterbath. To determining oxygen requirements, the following steps are taken.Using aseptic technique, each experimental organism is inoculated by introducing two drops of the culture that is Staphylococcus aureus, Corynebacterium xerosis and Enterococcus faecalis, Saccharomyces cerevisiae, Aspergillus niger and Clostridium sporogenes from a sterile Pasteur pipette into the appropriately labeled tubes of molten agar. The freshly inoculated molten infusion agar is vigorously rotate between the palms of the hands to distribute the organisms. Inoculated test tubes is placed in an upright position in the iced waterbath to solidify the medium rapidly. The Staphylococcus aureus, Corynebacterium xerosis, Enterococcus faecalis and Clostridium sporogenes cultures is incubated for 24 to 48 hours at 37°C and the Aspergillus niger and Saccharomyces cerevisiae cultures is incubated for 48 to 72 hours at 25°C. After incubation, each of the experimental cultures is observed for the distribution of growth in each tube. Observation is recorded and the oxygen requirements for each of the experimental species is determined in the chart provided in the Lab Report.

Experiment 17:Techinques for the Cultivation of Anaerobic Microorganisms
From this experiment, I learnt that some microorganisms can only survive under anaerobic microorganisms. I learnt how to determine anaerobes and aerobes through this experiment. The procedures of the experiment are as followed.The procedures of the experiments are as followed. Firstly, the experiment is carried out by using the fluid Thioglycollate Medium. For the performance of this procedure, the fluid thioglycollate medium must be fresh. Freshness is indicated by the absence of a pink color in the upper one- third of the medium. If this coloration is present, the screw caps is loosen and the tubes is placed in a boiling water bath for 10 minutes to drive off the dissolved O2 from the medium. The tubes is cooled to 45°C before inoculation. The appropriately labeled tubes organisms that is the Bacillus cereus, Escherichia coli, and Micrococcus luteus and Clostridium sporogenes is aseptically inoculated by means of loop inoculations to the depths of the media. The cultures are incubated for 24 to 48 hours at 37°C.


Experiment 16: Physical Factores: Atmospheric Oxygen Requirements
In this experiment, I have learnt different oxygen requirements of different microorganisms. Basically, microorganisms are divided into five groups based on their oxygen requirements. There are aerobes which require oxygen, microaerophiles which require limites amounts of atmospheric oxygen for growth, obligate anaerobes which requires absent of oxygen, aerotolerant anaerobes whivh are fermentative organisms and facultative anaerobes which can grow in the presence or absence of oxygen. To carry out this experiment, the procedures are as followed.The procedures of the experiment are as followed. The sterile brain heart infusion agar is first liquefied by boiling in a waterbath at 100°C. Molten agar is cooled to 45°C. The temperature is checked with a thermometer inserted into the waterbath. To determining oxygen requirements, the following steps are taken.Using aseptic technique, each experimental organism is inoculated by introducing two drops of the culture that is Staphylococcus aureus, Corynebacterium xerosis and Enterococcus faecalis, Saccharomyces cerevisiae, Aspergillus niger and Clostridium sporogenes from a sterile Pasteur pipette into the appropriately labeled tubes of molten agar. The freshly inoculated molten infusion agar is vigorously rotate between the palms of the hands to distribute the organisms. Inoculated test tubes is placed in an upright position in the iced waterbath to solidify the medium rapidly. The Staphylococcus aureus, Corynebacterium xerosis, Enterococcus faecalis and Clostridium sporogenes cultures is incubated for 24 to 48 hours at 37°C and the Aspergillus niger and Saccharomyces cerevisiae cultures is incubated for 48 to 72 hours at 25°C. After incubation, each of the experimental cultures is observed for the distribution of growth in each tube. Observation is recorded and the oxygen requirements for each of the experimental species is determined in the chart provided in the Lab Report.
Picture of C. sporogenes which is aerotolerant
Experiment 17:Techinques for the Cultivation of Anaerobic Microorganisms
From this experiment, I learnt that some microorganisms can only survive under anaerobic microorganisms. I learnt how to determine anaerobes and aerobes through this experiment. The procedures of the experiment are as followed.The procedures of the experiments are as followed. Firstly, the experiment is carried out by using the fluid Thioglycollate Medium. For the performance of this procedure, the fluid thioglycollate medium must be fresh. Freshness is indicated by the absence of a pink color in the upper one- third of the medium. If this coloration is present, the screw caps is loosen and the tubes is placed in a boiling water bath for 10 minutes to drive off the dissolved O2 from the medium. The tubes is cooled to 45°C before inoculation. The appropriately labeled tubes organisms that is the Bacillus cereus, Escherichia coli, and Micrococcus luteus and Clostridium sporogenes is aseptically inoculated by means of loop inoculations to the depths of the media. The cultures are incubated for 24 to 48 hours at 37°C.
Secondly, the
experiment is carried out using GasPak Anaerobic Technique. The GasPak system
is a contemporary method for the exclusion of oxygen from a sealed jar used for
incubation of anaerobic cultures in a nonreducing medium. This system uses a
GasPak generator that consists of a foil package that generated hydrogen and
carbon dioxide upon the addition of water, A palladium catalyst in the lid of
the jar combines the evolved hydrogen with residual oxygen to form water,
thereby creating a carbon dioxide environment within the jar that is conducive
for anaerobic growth. The establishment of anaerobic conditions is verified by
the colour change of a methylene blue indicator strip in the jar. This blue
indicator becomes colourless in the absence of oxygen.
The procedures of GasPak Anaerobic Technique are as followed.
By using a glassware marking pencil, the bottom of each nutrient agar plate is
divided into two sections. Each section on two plates is labelled with the name
of the organism to be inoculated that is Bacillus cereus, Escherichia coli,
and Micrococcus luteus and Clostridium sporogenes. Step 2 is
repeated to prepare a duplicate set of cultures. Using aseptic technique, a
straight line streak of each test organism is made in its respectively labelled
section on both sets of plates. The corner of the hydrogen and carbon dioxide
gas generator is torn off and this is inserted inside the GasPak jar. One set
of plate cultures is placed in an inverted position inside the GasPak chamber.
The anaerobic indicator strip is exposed and is placed inside the anaerobic jar
so that the wick is visible from the outside. With a pipette, the required 10ml
of water is added to the gas generator and the chamber is quickly sealed with
its lid. The sealed jar is placed in an incubator at 37°C for 24 to 48 hours. After several hours of incubation, the
indicator strip is observed for a colour change to colourless, which is
indicative of anaerobic conditions. The duplicate set of plates is incubated in
an inverted position for 24 to 48 hours at 37°C under aerobic conditions. After incubation, the Fluid Thioglycollate
cultures, GasPak system, and aerobically incubated plate cultures are observed
for the presence of growth. Results are recorded in the chart provided in the
Lab Report. Based on observation, the oxygen requirement classification of each
test organism is recorded as anaerobes, facultative anaerobes, or aerobes.
Picture of microorganisms in agar plate to study the oxygen requirements.
Sunday, November 26, 2017
eportfolio week 10
Experiment 14 and 15
This week I carry out experiment 14 (Physical Factors: Temperature) and experiment 15 ( Physical Factors: pH of The Extracellular Environment. In experiment 14, the procedures of doing the experiment were as followed. We first scored the underside of all plates into four quadrants with a glassware marker. We labelled each section with the name of the test organism to be inoculated. We included the temperature of incubation (4°C, 20°C 37°C or 60°C) when labelling the cover of each plates. Then, we aseptically inoculated w=each of the plates with E. coli, B. stearothermophilus, P. aeruginosa and S. marcescens by means of a single line of inoculation of each organism in its appropriately labelled section. Then, we appropriately labelled the four Sabouraud broth tubes, including the temperatures of incubation as indicated above. We then gently shook the S. cerevisiae culture to suspend the organisms. We aseptically added one drop of the culture into each of the four tubes of broth media by using a sterile Pasteur pipette. All the plates and the broth cultures were then incubated in an inverted position abd at each of the four experimental temperatures. (4°C, 20°C 37°C or 60°C) for 24 to 48 hours. We then observed all the growth of the culture and classified the organisms as psychrophiles, mesophiles, facultative thermophiles or obligate thermophiles respectively at the next day. This experiment enabled me to determine whether the optimum growth temperature is also the ideal temperature for enzyme-regulated cell activities such as pigment production and carbohydrate fermentation. I also learnt about the diverse growth temperature requirements of bacteria.
In experiment 15, the procedures of the experiment were as followed. First, I inoculated a series of the appropriately labelled TSB (12 Trypticase soy broth) tubes of media, pH values of 3, 6, 7, and 9 with E. coli by adding 0.1 ml of the saline culture to each. I repeated the step just now for the inoculation of A. faecalis and S. cerevisiae by using a new sterile pipette each time. Finally, we incubated the A. faecalis and E. coli cultures for 24 to 48 hours at 37°C and the S. cerevisiae cultures for 48 to 72 hours at 25°C. We used the spectrophotometer to determine the absorbance of all cultures and record the readings in the Lab Report.
Sunday, November 19, 2017
Eportfolio week 9
This week I have done two experiment which are experiment 12 and experiment 13. Experiment 12 is on Nutritional Requirements: Media for the Routine Cultivation of Bacteria while Experiment 13 is on the Use of Differential, Selective, and Enriched Media. For experiment 12, the procedures are as followed. We first inoculate the microorganisms (E. coli, A. faecalis and S.mitis) to different media ( yeast extract broth, nutrient broth, glucose broth and inorganic synthetic broth in four test tubes respectively by using Mohr pipette. After inoculate the broth culture and incubate the culture for 24 to 48 hours, we use the spectrophotometer to measure the optical density readings with the wavelength of 600nm. First, we measure the blank of culture, then we only measure the optical density for different media containing different microorganisms.
For experiment 13, we do the experiment by following the procedures. We label the cover of the plate properly and divide each of the Petri dishes into the required number of section by marking the bottom of the dishes. Each section are labelled with the name of the organism to be inoculated. Using aseptic technique, we inoculate all plates, except the blood agar plate, with the designated organisms by making a single line of inoculation of each organism in its appropriate section. Using aseptic techniques, we inoculate the blood agar by making a single line of inoculation. On completion of each single line of inoculation, we use the inoculating loop and make three or four stabs at a 45 degree angle across the streak.
We inoculate each of the different media with the following:
a) Phenylethyl alcohol agar: E.coli, S. aureus, and E. faecalis.
b) Crystal violet agar: E. coli, S.aureus, and E. faecalis.
c) 7.5% sodium chloride agar: S. aureus, S. epidermidis and E. coli
d) Mannitol salt agar: S. aureus, S.epidermidis, E. aerogenes. and E.coli
e) MacConkey agar: E. coli, E. aerogenes, S. typhrimurium, and S. aureus
f) Eosin-methylene blue agar: E. coli, E. aerogenes, S. typhimurium, and S. aureus
g) Blood agar: E. faecalis, S. mitits, and Streptococcus pyogenes.
The phenyethyl alcohol agar plate was incubated in an inverted position for 48 to 72 hours at 37 degree celcius while the remaining plates were incubated in an inverted position for 24 to 48 hours at 37 degree celcius.
The other day, we examine each plate and recorder the result according to the amount of growth along line of inoculation, appearance of the growth and the change in appearance of the medium surrounding the growth.
The purpose of this experiment is to understand which medium is suitable to culture which microorganisms.
The picture of the spectrophotometer

The picture of the culvate and the nutrient broth

The picture of the blood agar with microorganisms after incubation

The picture of phenyethyl alcohol agar plate with microorganisms after incubation

E-portfolio week 8
This week I have my hands on test on streak plate and simple staining. Then, I did an experiment on capsule stain and spore stain. For spore stain, the procedures for the experiment were as followed.
Individual smears were made in usual manner by using aseptic technique on two clean
glass slides. The smears were allowed to air-dry and heat fix in the usual
manner. Then. the smears were flooded with malachite green and placed on top of
a beaker of water sitting on a warm hot-plate, allowing the preparation to
steam 2 to 3 minutes. The slides were then removed from the hot plate, cooled
and washed under running tap water. Next, the slides were counterstained with
safranin for 30 seconds and washed with tap water. Finally, the smears were
blotted dry with bibulous paper and examined under oil immersion. The organisms used are Bacillus cereus and Clostridium sporogenes.
For capsule stain, I did the following procedures.The procedures of the experiment were as followed. One glass slides was obtained and several drops of crystal violet stain were placed on the slide. By using aseptic technique, three loopfuls of Klebsiella pneumonia were added to the stain and mixed gently with the inoculating loop. Then with a clean slide, the mixture was spreaded over the entire surface of the slide to create a very thin smear and the slide was let stand for 5 to 7 minutes. The smear was allowed to air-dry. The smears were washed with 20% copper sulphate solution. Finally, the smears were blotted dry and examine under oil immersion. Step 1 to 5 was repeated for Enterobacter aerogenos.


For capsule stain, I did the following procedures.The procedures of the experiment were as followed. One glass slides was obtained and several drops of crystal violet stain were placed on the slide. By using aseptic technique, three loopfuls of Klebsiella pneumonia were added to the stain and mixed gently with the inoculating loop. Then with a clean slide, the mixture was spreaded over the entire surface of the slide to create a very thin smear and the slide was let stand for 5 to 7 minutes. The smear was allowed to air-dry. The smears were washed with 20% copper sulphate solution. Finally, the smears were blotted dry and examine under oil immersion. Step 1 to 5 was repeated for Enterobacter aerogenos.
The
procedures of negative staining were also done to observe the capsule of the
organisms by using nigrosin. The procedures for negative stain were as
followed. First, a small drop of nigrosin was placed close to one end of a
clean slide. Then, a loopful of inoculum from the Klebsiella pneumonia culture was placed in the drop of nigrosin by
using aseptic technique and mixed. Next,
a slide was placed against the drop of suspended organisms at 45° angle and the drop was allowed to spread along the edge of
the applied slide. The slide was then pushed away from the drop of suspended
organisms to form a thin smear. Steps 1 to 4 were repeated for slide
preparation of the remaining cultures. The slides were then examined under oil
immersion.
Slides of the microorganisms for spore stain,capsule stain and negative stain

Micrograph of Bacillus cereus under 1000X magnification

Micrograph for capsule staining under 1000X for Enterobacter aerogenes.

Saturday, November 4, 2017
eportfolio basic technique week 7
Experiment 9 and 10
This week, the experiment that I have done is the gram-staining and acid-fast staining. Gram staining is a differential staining which determine whether the bacteria is gram positive or gram negative. All the bacteria is negatively charged. Gram staining differentiates the bacteria based on the cell wall which is the thickness of the peptidpoglycan. Gram positive bacteria has a thicker cell wall. Therefore, the crystal violet can be retained in the cell wall. Gram negative bacteria has a thinner cell wall. Therefore, it only retains the counterstain safranin. The procedure of gram staining is as followed. First, we gently flooded the smears with crystal violet and let stand for 1 minute. Then, we washed it with tap water. Next, we flooded the smears with Gram's iodine mordant and let stand for 1 minute. The smear is then later decolorized with 95% ethyl alcohol. The reagent was added drop by drop until the alcohol runs almost clear,showing only a blue tinge. Then, we gently washed the smear with tap water and counterstained with safranin for 45 seconds. It was gently washed again with tap water. The smear was then blotted dry with bibulous paper and examined under oil immersion. The gram staining were done for cultures of E. coli, S. aureus , B. cereus and the mixture of S.aureus and E. coli.
The next experiment which is experiment 10 is acid-fast staining. Acid-fast staining shows postive result for bacteria which has a thick, waxy wall that makes penetration by stains extremely difficult. The postive result is the smear of the bacteria will become pink in colour while negative results is the bacteria smear become blue in colour. The procedure of acid-fast stain is as followed. Smear of Mycobacterium smegmatis , Staphylococcus aureus and the mixture of both bacteria are prepared. The smears are then flooded with carbol fuchsin and placed over a beaker of water on a warm hot plate, allowing the preparation to steam for 5 minutes. Next, the smears were washed with tap water and heat slides must be cooled prior to washing. Then, decolorize the smears with acid-alcohol, adding the reagent drop by drop until the alcohol runs almost clear with a slight red tinge. The tap water was used to wash the smear. Finally, blot dry the smear with bibulous paper and the slides were examined under oil immersion.
The slides of gram-staining and acid-fast stain

The slides of Bacillus cereus under oil immersion

The slides of the mixture of S. aureus and E. coli

The slides of M. smegmastis under oil immersion

Friday, October 27, 2017
e-portfolio sixth week
During the lab this week, I had done 3 experiments which is experiment 6( preparation of bacterial smear), experiment 7( simple staining) and experiment 8 (negative staining).All the experiment we did used gram-negative bacteria. For the bacterial smear we have done bacterial smear to be used for the simple staining and negative staining experiment. The bacteria we used are Staphylococcus aureus, Bacillus cereus, Escherichia coli, Micrococcus Luteus and Bacillus subtilis. There are two type of bacterial smears which are the smears from a broth medium and the smears from a solid medium. The bacterial smears we done are the smears from solid medium which is the agar plate. The process of carrying out bacterial smear follow the following procedures. First, clean the glass slides by flaming it. Then, using a loop, place one to two loops of water on each slides. Then, with a sterile loop, we touch the entire loop to the culture and emulsify the cells in water on all the slides respectively. Next, we allow the slides to air-dry completely by placing them on the bench.Finally, we heat fix the preparation.
We did simple staining for Escherichia coli, Bacillus cereus and Staphylococcus aureus.The stains we used are the carbolfuchsin, methylene blue and crystal violet. We did it in a group and each bench must prepare two sets of the simple staining of the bacteria for each different stains. We prepared 18 slides in total. For the procedures of the simple stain, we used the bacterial smears we prepared during experiment 6. First, place a slide on the staining tray and flood the smear with one of the indicated stains, using the appropriate exposure time for each: carbolfuchsin,15-30 second; crystal violet,20-60 seconds; methylene blue, 1-2 minutes. Then, we gently wash the smear with tap water to remove excess stain. During this step, hold the slide parallel to the stream of water, in this way, I can reduce the loss of organisms from the preparation. Next, we blot dried the slide by using bibulous paper. We did the procedures for all the organisms by using all three different type of stains for each organisms.
For negative stains, the background is stained dark while the bacteria remains colourless. This is because the stain we used are nigrosin which acidic stain which negatively charged chromogen repel with the gram-negative bacteria. So, the bacteria resists staining and remained colourless. The bacteria we used are Micrococcus luteus, Bacillus cereus and Staphylococcus aureus. The procedures of negative staining is as followed. First, we placed a small drop of nigrosin close to one end of a clean slide. Then, by using aseptic technique, we placed a loopful of inoculum from the M. luteus culture in the drop of nigrosin and mix. We then placed a slide against the drop of suspended organisms at 45 degree angle and allow the drop to spread along the edge of the applied slide. Next, we push the slide away from the frop of suspended organisms to form a thin smear. We air-dried the slides. Heat fix should not be done for negative staining. We repeat the steps 1-4 for slide preparations of the remaining cultures, We then examined all the slides under high power and oil immersion and recorded the result in the Lab report.
Simple staining using crystal violet, methylene blue and carbolfuchsin and negative staining using nigrosin for E. coli
The slide of E. coli of carbolfuchsin (simples staining)

The slide of E. coli for negative staining

The slide of S.aureus for simple staining (crystal violet)

The slide of B.cereus using methylene blue (simple staining)

Saturday, October 14, 2017
eportfolio-week 5
During this week,we have done an experiment which is experiment A, which is the microscopic measurement of microorganisms. In this experiment, I learnt to calibrate on ocular micrometer. The ocular micrometer is inserted into the ocular lens.Then, I observe the ocular lens with the calibration.Then, I put the stage micrometer with 0.01mm on the stage.Then, I superimposed teh ocular micrometer over the stage micrometer.I calculate the calibration factor for the magnification of 100x, 400x, and 1000x and one ocular division for each magnification.One ocular division on ocular micrometer in mm is calculated by using the formula : (known distance between two lines on stage micrometer/number of divisions on ocular micrometer). Then, I observed the prepare sides of yeast cells, protozoa, and bacterial cocci and bacilli under the all the magnification and calculate the number of ocular division for each microorganisms. Then, I calculated the length of organism by using the formula :(number of ocular divisions occupied x calibration factor for one ocular division)

Micrograph of yeast cell with calibration

Saturday, October 7, 2017
e-portfolio fourth week (experiment 4 and 5)
Experiment 4:Microscopic examination of stained cell preparation
During the fourth experiment, I have the chance to use the compund light microscope.We are told how to handle the microscope carefully.When holding the microscope,we need to put one hand at the arm of the microscope while the other hand at the base of the microscope.Then,we put the mciroscope at our bench.We were given some prepared slides of Staphylococcus aureus, Bacillus subtilis, Bacillus cereus, slide of blood smear and slides of Saccharomyces cerevisiae.We observe the slide starting by using magnification of 40x,followed by 100x, 400x and 1000x(oil immersion).


During the fourth experiment, I have the chance to use the compund light microscope.We are told how to handle the microscope carefully.When holding the microscope,we need to put one hand at the arm of the microscope while the other hand at the base of the microscope.Then,we put the mciroscope at our bench.We were given some prepared slides of Staphylococcus aureus, Bacillus subtilis, Bacillus cereus, slide of blood smear and slides of Saccharomyces cerevisiae.We observe the slide starting by using magnification of 40x,followed by 100x, 400x and 1000x(oil immersion).
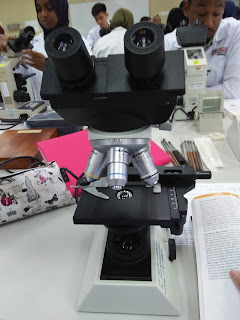
Pictures of compound light microscope

Slide of Staphylococcus aureus (high power)

Slide of Saccharomyces cerevisiae (high power)

Slide of Bacillus subtilis (high power)

Slide of Bacillus cereus (high power)

Slide of Saccharomyces cerevisiae

Slide of red blood cell

Experiment 5:Microscopic Examination of Living Microorganisms Using a Hanging-Drop Preparation or a Wet Mount
In this experiment,I learnt how to prepare a hanging-drop and wet mount.To prepare the hanging-drop,I have to spread a ring of petroleum jelly around the concavity of the depression slide.Then,I place of loopful of the bacterial culture in the center of the coverslip. Then,I lower the depression slide,with the concavity facing down,onto the coverslip and press gently to form a seal.Finally,I turn the hanging-drop preparation over so that the culture drop adheres to the coverslip.For the wet mount,
I use the cotton swab to apply a thin layer of petroleum jelly along the edge of the four sides of a coverslip.Then,by using the aseptic techniques,I place a loopful of the culture in the center of the coverslip.After that,I place a clean glass slide over the coverslip and press the slide gently to form a seal between the slide and coverslip.Next,I turn the wet mount preparation slide over so that the culture drop adheres to the coverslip.We did the hanging drop and wet mount preparation for the broth cultures of P.aeruginosa, B.cereus,S.aureus,,P.vulgaris,hay infusion and pond water.I observe it under high power and oil immersion and record the observation in a table.
Slide of Bacillus cereus

Slide of S.aureus

Saturday, September 30, 2017
e-portfolio teknik asas mikrobiologi (third week)
Experiment 2
In this week,I learn the techniques for isolation of pure cultures.The techniques commonly used for isolation of discrete colonies require that the number of organisms in the inoculum be reduced.I learn how to do streak-plate and spread-plate to isolate a single colony.The streak-plate method is a rapid qualitative isolation method.It involves using the principle of dilusion where I am able to get single colony of two type of mixed culture at the end.It is essentially dilution techniques that involve spreading a loopful of culture over the surface of an agar plate.There are two types of streak-plate technique,four ways streak-plate technique and alternate streak-plate method.


In this week,I learn the techniques for isolation of pure cultures.The techniques commonly used for isolation of discrete colonies require that the number of organisms in the inoculum be reduced.I learn how to do streak-plate and spread-plate to isolate a single colony.The streak-plate method is a rapid qualitative isolation method.It involves using the principle of dilusion where I am able to get single colony of two type of mixed culture at the end.It is essentially dilution techniques that involve spreading a loopful of culture over the surface of an agar plate.There are two types of streak-plate technique,four ways streak-plate technique and alternate streak-plate method.
Four ways streak-plate technique

Alternate streak-plate technique

All the streak-plate method involves streaking in four quadrant.To streak from the third quadrant to the fourth quadrant,we do not need to flame the loop again because the culture at third quadrant is dilute enough where I streak to fourth quadrant,I manage to get a single colony.
I did streak-plate to isolate S.marcescens and S.aureus from the mixed culture of both bacteria.I also did streak-plate for the mixed culture of S.aureus and E.coli. However, I was unsuccessful in doing this experiment because it was the first time I learn about this and I use the wrong spreading techniques though I was able to get single colony at the end of bacteria.I hope I can improve my streaking technique better in the next experiment.
Streak-plate of the mixed culture of S.marcescens and S.aureus

Streak-plate of the mixed culture of S.aureus and E.coli

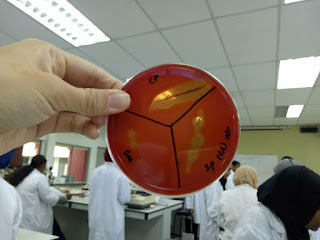
In experiment 2,I also learnt to collect specimen using cotton swab from the female toilet basin and put it into Bijou bottle containing sterile water.We did both streak-plate and spread-plate techniques for the environmental sample we collected.
Streak-plate of the environmental sample

Spread-plate of the environmental sample

In part B of the experiment,we isolate the single colony from streak-plate or spread-plate and spread it to four different agar slant.
Experiment 3
In this experiment,I learnt about the cultural characterisctics of microorganisms.These cultural characteristics are used as a basis for separaring microorganisms into taxonomic groups.They are determined by culturing the organisms on nutrient agar slants and plates,in nutrient broth,and in nutrient gelatin.
These is how we differentiate and determine the cultural characterisctic of the bacteria.

In the nutrient agar slant,we used single straight line of inoculation on the surface instead of using zig-zag pattern to observe the growing pattern of the bacteria.We transfer the M.luteus,P.aeruginosa,M.smegmatis,E.coli and B.sereus to the nutrient agar slant,nutrient agar plates ,nutrient broth cultures and nutrient gelatin using the aseptic techniques.
nutrient agar slant culture

nutrient agar plates


nutrient broth culturs

nutrient gelatin

Subscribe to:
Comments (Atom)
-
 E-portfolio (Teknik asas mikrobiologi) This week I have learnt the culture transfer techniques.Microorganisms are transferred from one ...
 -
During the lectures, we have a quiz section where each groups prepared some questions. There are some questions asked such as what will happ...